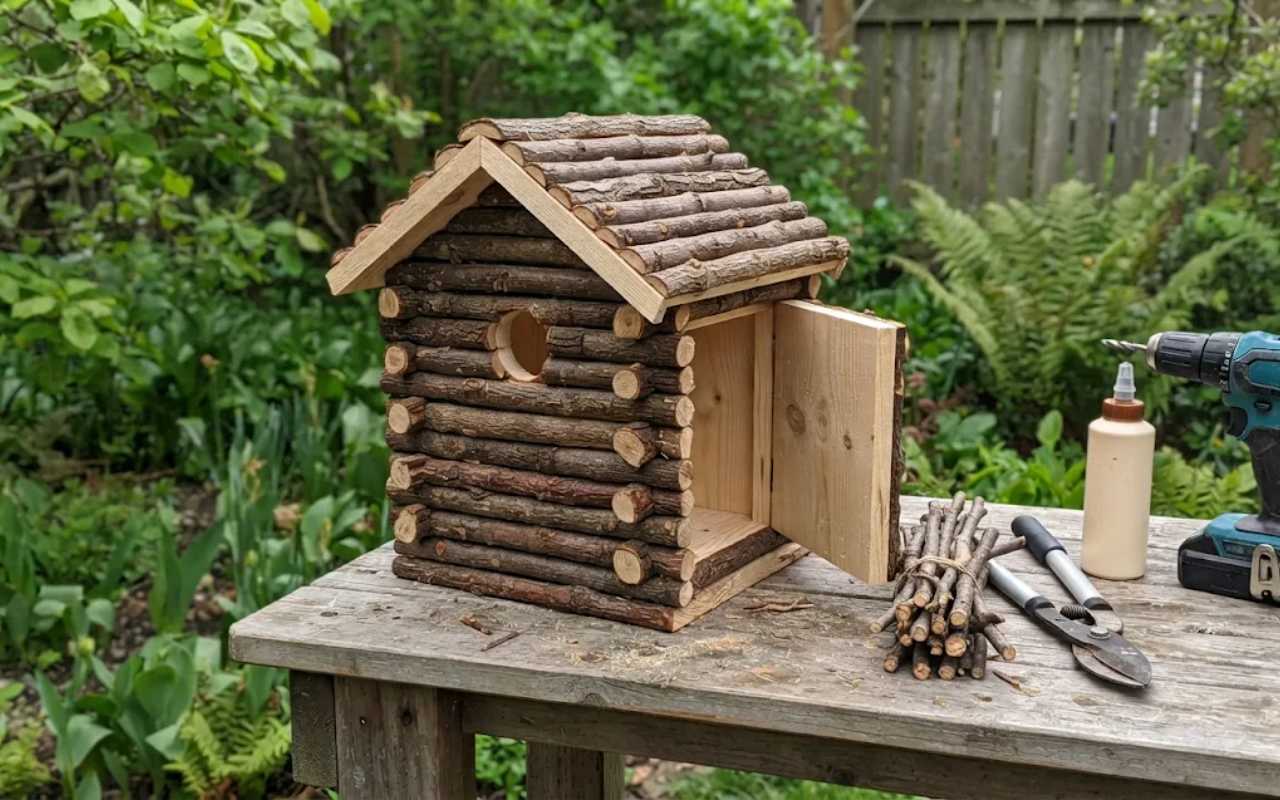
Following a functional log cabin bird house build turns harvested yard twigs into a weatherproof, predator-safe nest box for Black-capped Chickadees, Tufted Titmice, and House Wrens. Unlike flimsy craft-store twig houses that crumble after one spring rainstorm, stacking uniform, bark-covered branches around a solid 3/4-inch interior wood core gives your nest box true thermal insulation, draft-free walls, and a side-pivoting cleanout door for annual maintenance.
You can cut, assemble, and weatherproof this rustic cabin in a single weekend using straight fallen branches, waterproof exterior wood glue, coated trim screws, and basic garage tools. Following exact ornithological specs for entrance hole diameter, cavity floor area, and perch-free entry ensures your mini log cabin attracts real cavity-nesting songbirds rather than invasive European Starlings.
Quick-Glance Build Summary
Most decorative twig birdhouses fail outdoors because builders glue sticks together with craft hot glue over thin cardboard or omit drainage holes. Framing a structural 3/4-inch pine or cedar core box first and cladding the exterior with notched hardwood twigs delivers genuine multi-year durability.
- Prep & Build Time: 3 to 4 hours (plus 24 hours glue cure time)
- Target Songbird Species: Black-capped Chickadees, Carolina Chickadees, Tufted Titmice, and House Wrens
- Exact Entrance Hole Size: 1-1/4 inches (32 mm) in diameter to admit chickadees, titmice, and House Wrens while blocking larger European Starlings
- Core Structural Dimensions: 7 × 7-inch exterior core footprint (5-1/2 × 5-1/2-inch interior floor) and 9-1/2 inches tall at the 30-degree roof peak
- Best Twig Wood Species: Straight, dry 1/2-inch to 3/4-inch branches from oak, maple, birch, ash, or apple and pear prunings (avoid toxic black walnut, oleander, or yew)
- Critical Safety Rules: Zero exterior perches below the entrance hole, a completely raw unpainted interior, and a side-pivoting cleanout door for autumn nest cleanouts
Why Most DIY Twig Birdhouses Fail Outdoors (And How to Fix Them)
Standard craft tutorials tell beginners to stack twigs around a milk carton using a hot glue gun. In real backyard weather, craft hot glue turns brittle and snaps during winter freezes, while unventilated twig gaps let cold drafts and driving rain soak newly hatched chicks.
According to nest box construction guidelines from the Cornell Lab of Ornithology’s NestWatch, a safe cavity nest box requires solid walls at least 3/4-inch thick for thermal insulation, a 5-1/2 × 5-1/2-inch interior floor for chickadees and titmice, a sloped roof overhang to shed rain, two 5/8-inch side ventilation holes near the top, and four 3/8-inch to 1/2-inch floor drainage holes.
Building a tight 3/4-inch pine or cedar inner core box and fastening hardwood twigs over the outside gives you authentic log-cabin charm with full NestWatch weather protection.
Log Cabin Bird House Cut List & Materials
| Cabin Component | Wood Material | Exact Dimensions | Quantity |
|---|---|---|---|
| Front & Back Core Walls | 3/4-in. Cedar or White Pine | 7 in. W × 9-1/2 in. H (30° roof slope) | 2 pieces |
| Fixed Side & Pivot Cleanout Door | 3/4-in. Cedar or White Pine | 5-1/2 in. W × 7-1/2 in. H (two 5/8-in. vents each) | 2 pieces |
| Recessed Drainage Floor | 3/4-in. Cedar or White Pine | 5-1/2 in. × 5-1/2 in. (corners clipped 3/8 in.) | 1 piece |
| Sloped Roof Deck Panels | 3/4-in. Cedar or White Pine | 9-1/2 in. L × 5-1/2 in. W (2-in. front overhang) | 2 pieces |
| Exterior Wall & Roof Twigs | 1/2–3/4-in. Hardwood Twigs | 7-3/4 in. (fixed walls), 5-3/8 in. (door) & 9-1/2 in. (roof) | 30–35 twigs |
Materials and Tools Checklist
Gathering moisture-proof adhesives, rust-resistant fasteners, and clean hardwood twigs keeps your rustic cabin standing through rain, snow, and summer heatwaves:
- 3/4-Inch Untreated Cedar or White Pine Board (1×8 nominal board, 5 feet long): Yields the 7-inch-wide front and back core walls, 5-1/2-inch side walls, floor, and pitched roof panels
- 30 to 35 Straight Hardwood Twigs (1/2-Inch to 3/4-Inch Diameter): Harvested from fallen oak, maple, birch, or fruit tree prunings; bake dry twigs at 250°F (121°C) for 1 hour to penetrate the wood core and eliminate bark beetles or carpenter ants
- ANSI/HPVA Type I Waterproof Exterior Wood Glue (such as Titebond III): Bonds wood joints and twig logs permanently without dissolving in rain
- 1-5/8-Inch Coated Exterior Trim Screws & 1-1/4-Inch Galvanized Brad Nails: Fastens the structural inner box, creates the side-door pivot hinge, and anchors exterior twig logs securely
- 1-1/4-Inch Forstner Bit or Spade Bit & 5/8-Inch Drill Bit: Drills a clean, splinter-free entrance hole and upper side ventilation holes
- 1 Small Brass Hook-and-Eye Latch: Secures the bottom of the side-pivoting cleanout door
- Miter Saw (or Hand Saw), Pruning Loppers, Cordless Drill, and 120-Grit Sandpaper: For cutting uniform twig lengths and smoothing the entrance rim
Step-by-Step Log Cabin Bird House Build Guide
To build a weatherproof log cabin bird house, assemble an insulated 3/4-inch inner core box with a side-pivoting cleanout door, drill precise ventilation and entrance holes, permanently attach a sloped roof, and notch and stack your twig logs up all four walls.
Step 1: Cut and Assemble the 3/4-Inch Inner Core Box
Cut your 3/4-inch cedar or pine board into the following exact structural core pieces:
- 1. Front & Back Walls: Two pieces measuring 7 inches wide by 9-1/2 inches tall, with the top edges angled at a 30-degree roof slope (rising 2 inches over each 3.5-inch half-width run from 7-1/2 inches at the outer side edges to 9-1/2 inches at the center ridge).
- 2. Fixed Side Wall & Pivot Cleanout Door: Two pieces measuring 5-1/2 inches wide by 7-1/2 inches tall (trim 1/8 inch off the top and bottom of the pivot door piece so it swings open smoothly without binding).
- 3. Recessed Drainage Floor: One piece measuring 5-1/2 inches by 5-1/2 inches with the four corners clipped off by 3/8 inch (or four 3/8-inch holes drilled through the floor) for drainage.
- 4. Glue and screw the front wall, back wall, and fixed left side wall together using ANSI/HPVA Type I waterproof wood glue and 1-5/8-inch exterior trim screws, recessing the 5-1/2 × 5-1/2-inch floor 1/2 inch up from the bottom edge so water cannot wick into the nest cavity.
Step 2: Install the Side-Pivoting Cleanout Door and Drill Holes
Rather than trying to hinge a pitched gable roof against a flat back wall (which causes the rear overhang to collide with the back board), build a side-pivoting cleanout door on the right side wall:
- 1. Slide the right side wall into place between the front and back walls, and drive one 1-5/8-inch exterior trim screw through the front wall and one through the back wall 1 inch below the top edge of the side panel to act as matching pivot pins.
- 2. Test-swing the door upward to confirm it pivots smoothly, then install a small brass hook-and-eye latch at the bottom edge to lock the door closed during nesting season.
- 3. Clamp the front wall and bore a 1-1/4-inch entrance hole centered 6 inches above the interior floor. Sand the rim smooth with 120-grit sandpaper, score three shallow horizontal kerf grooves below the hole on the inside wall for fledgling traction, and drill two 5/8-inch ventilation holes near the top of both side walls.
Step 3: Attach the Sloped Roof Deck Permanently
Cut two 3/4-inch roof deck boards measuring 9-1/2 inches long by 5-1/2 inches wide (beveling the top ridge edges at 30 degrees) to give a generous 2-inch front overhang over the entrance hole and 1-1/2-inch overhangs on the sides and back.
Glue and screw the two roof boards directly onto the top edges of the front, back, and fixed left side wall so the roof stays rigid and watertight year-round.
Step 4: Cut, Notch, and Stack Your Exterior Twig Logs
Cut 28 to 32 straight hardwood twigs to 7-3/4 inches long for the front, back, and fixed left walls (giving a 3/8-inch corner saddle overhang past the 7-inch core box), and cut 8 twigs to 5-3/8 inches long specifically for the right-hand cleanout door panel so the door swings open freely without catching on corner twigs:
- Score Half-Lap Notches: Use a wood rasp or utility knife to carve shallow 1/8-inch half-moon notches 3/8 inch from both ends of the fixed-wall twigs so horizontal logs nest tightly together.
- Build Up from the Base: Run a thick bead of waterproof Type I exterior wood glue along the bottom row of the core box, press your first logs into place, and secure each twig with two 1-1/4-inch galvanized brad nails driven into the 3/4-inch core wall. Keep the right cleanout door twigs confined strictly to the width of the door panel.
- Frame Around the Entrance Hole: When your stacked front logs reach the 1-1/4-inch entrance hole, cut shorter 2-7/8-inch twig segments to butt cleanly against the left and right sides of the circular opening, leaving zero protruding twig perch below the hole.
Shingle the Roof: Glue and brad-nail straight 9-1/2-inch twigs side-by-side across both roof slopes like rustic timber shingles.
Step 5: Add a Mounting Cleat (Keep the Interior Raw Wood)
Screw a vertical 1×2-inch wooden mounting cleat onto the back wall extending 2 inches above the roof peak and 2 inches below the floor so you can mount the cabin solidly to a wooden post or tree trunk.
Leave the interior cavity 100% raw wood, and if you want extra rain protection on the exterior twig bark, brush on a single light coat of 100% pure raw linseed oil and let it cure outdoors for 7 days before hanging.
Where to Mount Your Log Cabin Bird House
Even the best-built cabin will sit empty if mounted in the wrong yard spot. Follow proven nest box placement rules to attract chickadees, titmice, and wrens safely:
- Ideal Mounting Height: Mount the box 5 to 10 feet above the ground on a metal pole fitted with a wrap-around squirrel and raccoon baffle, or on a smooth tree trunk away from low climbing branches.
- Shrub & Window Clearance: Position the entrance hole facing east or northeast (away from afternoon sun and prevailing winds), 8 to 12 feet from dense shrubs for safe fledgling escape cover, and either within 3 feet or more than 30 feet from windows to prevent glass strikes.
- Annual Fall Cleanout: Unhook the bottom latch on the side cleanout door every autumn after chicks fledge, swing the side panel open, sweep out old moss and feathers, scrub the raw wood interior with a 1:9 household bleach-to-water solution, rinse thoroughly, and air-dry completely before winter.
Frequently Asked Questions About Log Cabin Bird Houses
Should you put a perch on a log cabin bird house?
No. Never add a wooden dowel or protruding twig perch below the entrance hole of a bird house. Native cavity-nesting songbirds like chickadees, titmice, and wrens cling effortlessly to rough bark and wood edges, whereas perches give invasive House Sparrows, European Starlings, and predators a convenient foothold to harass nesting parents and raid chicks.
What is the best glue for making a twig bird house?
Use an ANSI/HPVA Type I waterproof exterior wood glue (such as Titebond III Ultimate Wood Glue) paired with galvanized brad nails or coated trim screws. Standard craft hot glue, white school glue, and indoor PVA glues soften in summer humidity or turn brittle and snap during freezing winter temperatures.
How do you keep bugs out of bark-covered twigs on a bird house?
Before gluing harvested twigs onto your birdhouse, brush off loose moss or lichen and bake the dry twigs on a foil-lined sheet pan in your oven at 250°F (121°C) for 1 hour. Baking at 250°F allows heat to penetrate to the center of 3/4-inch branches, safely killing overwintering bark beetles, mites, and carpenter ant larvae without chemical insecticides.